Introduction
A log shelf brings the beauty of the outdoors into your living space, offering a rustic and natural charm to any room. Crafted from sturdy logs, this unique shelving solution not only provides functional storage but also adds a touch of earthy elegance to your home decor. Whether used to display your favorite books, potted plants, or cherished ornaments, a log shelf captures the essence of nature in a functional and stylish way.

Are you a DIY enthusiast with a penchant for rustic home decor? Building a log shelf can be an incredibly rewarding project that not only adds a touch of nature to your living space but also showcases your creativity and craftsmanship. Crafting a log shelf might seem daunting, but with the right materials, tools, and a step-by-step plan, you can create a stunning and functional piece of furniture that will be the envy of your guests. In this guide, we’ll walk you through the process of building your own log shelf, from selecting the right logs to assembling and finishing the final piece.
Materials You’ll Need
Before diving into the construction process, gather all the necessary materials and tools to ensure a smooth workflow. Here’s what you’ll need:
1. Logs: Choose logs with the desired diameter and length for your shelf. Make sure they are dry and free from cracks or decay.
2. Saw: A chainsaw or handsaw will be required to cut the logs to the desired lengths.
3. Sandpaper: To smooth out rough edges and surfaces.
4. Wood Stain or Sealant: For protecting and enhancing the natural beauty of the logs.
5. Screws or Brackets: To secure the logs together and attach the shelf to the wall.
6. Drill: For creating pilot holes and attaching screws.
7. Level: To ensure your shelf is straight when mounted.
8. Measuring Tape: To accurately measure the dimensions of the logs and the placement of the shelf.
Step-by-Step Guide
1. Log Selection: Choose logs that match the aesthetic you’re aiming for. The logs should be sturdy and free from any signs of rot or pests. You can use logs of varying diameters for a more eclectic look or opt for uniform sizes for a cleaner appearance.
2. Log Preparation: Using a chainsaw or handsaw, cut the logs to your desired shelf length. If you prefer a more polished look, remove the bark from the logs using a chisel or a drawknife. Sand the logs to smooth out any rough edges or surfaces.
3. Design Planning: Decide on the arrangement of your logs. You might want a symmetrical design or a more asymmetrical, natural arrangement. Sketch your design on paper to visualize how the logs will fit together.
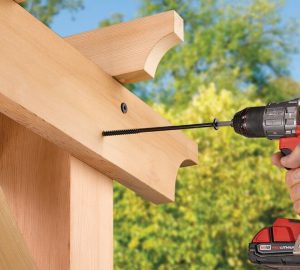
4. Drilling Pilot Holes: To prevent splitting, drill pilot holes through the logs where you intend to attach them. These holes will guide the screws and make assembly easier.
5. Assembling the Logs: Begin assembling the logs according to your design. Use screws or metal brackets to attach them securely. Start from the bottom and work your way up, ensuring that each log is level and aligned with the others.
6. Mounting the Shelf: Once the logs are securely attached, it’s time to mount the shelf on the wall. Use a level to make sure the shelf is straight. Mark the positions where you’ll be attaching the shelf to the wall.
7. Attaching to the Wall: Drill holes into the wall at the marked positions and insert wall anchors if needed. Then, carefully position the shelf and attach it to the wall using screws. Make sure it’s level before fully tightening the screws.
8. Finishing Touches: To enhance the shelf’s appearance and protect the logs, apply a wood stain or sealant of your choice. This step also helps to bring out the natural colors and textures of the wood.
9. Decorating the Shelf: Once the sealant is dry, you can start decorating your new log shelf. Add books, plants, decorative items, or anything that suits your style. The rustic charm of the log shelf will complement various decor themes.
Conclusion
Building your own log shelf is a gratifying endeavor that allows you to connect with nature and showcase your DIY skills. By carefully selecting logs, planning your design, and following each step of the construction process, you can create a unique and eye-catching piece of furniture that adds character to your home. Remember, the beauty of this project lies in its imperfections, as each log carries its history and story. So, gather your tools, roll up your sleeves, and embark on the journey of crafting a log shelf that reflects your creativity and craftsmanship.