As the world becomes increasingly aware of the negative effects of sitting for prolonged periods, many are turning to standing desks as a solution. Not only can they help improve posture, reduce back pain, and increase energy levels, but standing desks are also gaining popularity for their ability to boost productivity. For those who prefer a personalized touch and a budget-friendly option, building DIY standing desks is a fantastic project that offers both function and style. In this article, we will walk you through a comprehensive, step-by-step guide to building your very own standing desk, providing you with all the tips, tools, and materials necessary for success.
Why Choose DIY Standing Desks?
Customization for Your Needs
One of the main reasons why many people opt for DIY standing desks is the ability to fully customize the desk to their needs. Unlike pre-made standing desks, which come in standard sizes, building your own desk allows you to tailor the height, width, and design to perfectly suit your workspace. Whether you prefer a large surface area for multiple monitors or a minimalist setup for just your laptop, a DIY desk can be designed to fit your unique preferences.
Cost-Effective Solution
Another significant advantage of building your own standing desk is the cost savings. Standing desks sold in stores can be quite expensive, especially if you opt for height-adjustable models. However, by using inexpensive materials and tools, you can create a sturdy, functional, and aesthetically pleasing desk at a fraction of the cost of a pre-built one. With just a little investment in supplies and time, you can create a desk that meets your needs without breaking the bank.
Health and Wellness Benefits
Standing desks are widely known for their health benefits, such as reducing the risk of cardiovascular diseases, improving circulation, and alleviating the strain caused by sitting for long hours. By building your own DIY standing desks, you take the first step toward incorporating a healthier work routine into your daily life. Having the flexibility to switch between sitting and standing at your desk can also lead to better posture and reduced fatigue throughout the day.
Materials and Tools You’ll Need
Before starting your DIY standing desks project, it’s important to gather all the necessary materials and tools. Here’s a list of what you’ll need:
Materials
- Wood (plywood, MDF, or hardwood, depending on the finish you want)
- Metal legs (if you prefer a metal frame for added durability and modern aesthetics)
- Wood screws or L-brackets
- Wood glue (for extra strength)
- Paint or wood stain (optional, for finishing)
- Adjustable height mechanism (if you want the desk to be adjustable)
- Rubber floor protectors (for the legs, if desired)
Tools
- Measuring tape
- Circular saw or jigsaw (for cutting wood)
- Power drill (for making holes)
- Screwdriver
- Sandpaper (to smooth out rough edges)
- Paintbrush (if applying stain or paint)
- Level (to ensure the desk is even)
- Clamps (to hold wood pieces in place while you assemble)
Once you’ve gathered all your materials and tools, you’ll be ready to start building your DIY standing desk.
Step-by-Step Guide to Building Your DIY Standing Desk
1. Plan and Measure Your Desk
The first step in building DIY standing desks is to plan out the size and design of your desk. Measure the space where you intend to place your desk, and decide on the dimensions that will best suit your work habits. Keep in mind that a typical standing desk height is around 40 to 50 inches, but you should adjust this depending on your personal height and comfort.
When designing the desk, think about the surface area. Will you need space for multiple monitors, a keyboard, and other accessories? Sketch your ideas and make a list of the materials required.
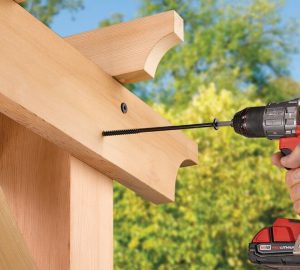
2. Cut the Wood Pieces
Once you’ve finalized your design, it’s time to cut the wood pieces according to the measurements you’ve taken. You’ll need a top surface, legs, and any additional shelves or compartments you want to include.
If you’re using plywood or MDF, make sure to use a circular saw or jigsaw to cut the pieces with precision. Use a measuring tape to mark the lines before cutting, and always wear safety goggles when working with power tools.
3. Assemble the Desk Frame
Next, assemble the frame of the desk. If you’re using wood, begin by attaching the legs to the top of the desk using screws and wood glue for added stability. You can also use L-brackets for a more secure connection. Make sure the legs are evenly placed, and use a level to ensure the desk is balanced and aligned properly.
If you’re opting for a metal frame, follow the manufacturer’s instructions to assemble the metal legs. Many metal frames are designed to be easy to assemble, with pre-drilled holes for screws. Once the frame is assembled, attach it to the wooden desktop using screws.
4. Sand and Finish the Surface
After the frame is assembled, it’s time to give the wood a smooth and professional finish. Use sandpaper to smooth out any rough edges or surfaces. Sanding will help eliminate splinters and ensure that the desk surface is smooth to the touch.
Once the desk is sanded, you can apply a wood stain or paint to give it the look you desire. Whether you prefer a natural wood finish or a more modern, painted appearance, the finishing touches will add a personalized aesthetic to your desk.
5. Install Adjustable Height Mechanism (Optional)
If you want your DIY standing desks to have an adjustable height feature, this is the time to install it. Adjustable desk frames are available online and are relatively simple to install. The mechanism typically includes hydraulic lifts or manual cranks, allowing you to easily switch between sitting and standing heights.
Follow the manufacturer’s instructions for your chosen adjustable height mechanism, and ensure that it is securely attached to the desk frame. Test the mechanism to make sure it works smoothly and can support the weight of your desk and equipment.
6. Final Touches
Once your desk frame and surface are complete, add any final touches to personalize the desk. You can add rubber floor protectors to the bottom of the legs to prevent damage to your flooring. Additionally, consider installing cable management trays or clips to keep wires organized and out of sight.
If you’re using the desk in a home office, consider adding decorative elements, such as plants, desk organizers, or a comfortable chair that complements your new standing desk.
Building your own DIY standing desks is a highly rewarding project that allows you to create a functional, customized workspace without spending a fortune. By following the step-by-step guide above, you can design and build a desk that suits your needs and enhances your productivity. Not only will a DIY standing desk improve your posture and overall health, but it will also provide you with a unique, personalized piece of furniture that fits perfectly into your home office or workspace. Whether you choose a static design or an adjustable height model, your new desk will be a practical and stylish addition to your home.