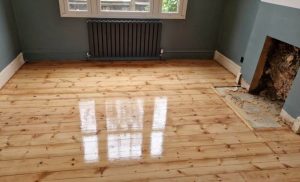
I once stood in the foyer of a beautifully restored 1920s craftsman home, staring at a concrete and terrazzo floor that looked completely lifeless. The homeowner had spent a small fortune on high-end chemical sealers and top-tier mops, yet the surface remained dull, cloudy, and disappointingly matte. They looked at me and asked if they needed to tear it all out. I smiled, went out to my truck, and grabbed my variable-speed rotary machine and a specific sequence of abrasive discs. Within two hours, half the room was reflecting the chandelier overhead like a sheet of pure ice.
In my ten-plus years of restoring residential and commercial floors, I have learned that a mirror-like shine is almost never achieved out of a liquid bottle. True gloss is a mechanical achievement. To unlock that deep, jaw-dropping luster on concrete, stone, or hardwood, you need to understand the physics of refinement through the lens of a high-performance floor polishing pad.
Let’s take a deep dive into the technical mechanics of surface abrasion and look at how you can manipulate grit dynamics to achieve professional-grade flooring results on a DIY budget.
The Physics of Reflection: Micro-Topology Explained
To understand why a floor won’t shine, we have to look at it under a microscopic lens. A dull floor is like an uncalibrated gravel road; its surface is full of microscopic peaks and valleys. When ambient light hits those jagged valleys, the light waves scatter in a million different directions, which your eyes perceive as a dull, matte finish.
Achieving a high-gloss finish is simply the process of flattening those peaks until the surface is completely level. When light hits a perfectly flat, uniform plane, it bounces back at a uniform angle. This is called specular reflection.
   [Dull Surface / Scattered Light]          [Polished Surface / Mirror Reflection]
          \   |   /   ^                             \         /
           \  |  /   /                               \       /
     _______v__v__v_/_                      __________v_____v___________
     (Microscopic Peaks)                      (Perfectly Flattened Plane)
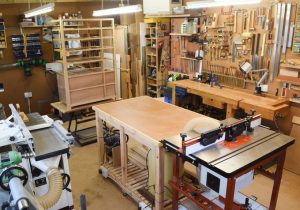
Think of using a floor polishing pad as the flooring equivalent of sharpening a high-end chef’s knife. You don’t jump straight to a leather strop; you systematically work your way through coarse, medium, and fine abrasive matrices until the edge—or in this case, the floor—is perfectly smooth.
Navigating Grit Metrics: The Diamond and Fiber Matrix
When you walk into an equipment rental yard, the sheer variety of pads can be completely overwhelming. Selecting the wrong pad density or grit sequence won’t just keep your floor dull—it can permanently gouge your structural material.
1. Diamond Impregnated Pads (DIP)
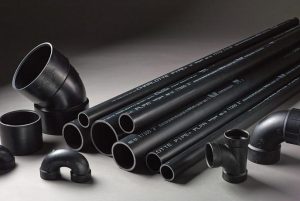
For hard structural substrates like concrete, terrazzo, and natural marble, traditional synthetic fibers won’t cut it. You need a floor polishing pad embedded with microscopic industrial diamond clusters. These are categorized by their grit rating, which dictates the level of aggressive cutting power.
-
Coarse Grits (30 to 150 Grit): These are your heavy-duty leveling tools. They are engineered to strip away old epoxy coatings, flatten lipages (uneven tile edges), and open up the pores of the material.
-
Medium Grits (200 to 800 Grit): This is the transitional honing stage. These pads erase the visible scratch patterns left behind by the coarse step and prepare the stone for chemical densification.
-
High-Gloss Fine Grits (1500 to 3000+ Grit): This is where the magic happens. The diamond particles at this level are so tiny that they don’t visually scratch; instead, they buff the surface molecules into a glass-like finish.
2. Non-Woven Synthetic Pads: The Color-Coded System
If you are working on resilient flooring like vinyl composition tile (VCT), engineered hardwood, or linoleum, you will be utilizing non-woven polyester or nylon fiber pads. The industry uses a strict color-coded standard to indicate abrasive levels:
-
Black/Brown: Maximum abrasion, used exclusively for wet chemical stripping of old wax layers.
-
Green/Blue: Moderate abrasion, designed for deep scrubbing and removing heavy scuff marks.
-
White/Red: Ultra-fine density, engineered for daily spray buffing and dry burnishing to maintain topcoat gloss levels.
Step-by-Step Mechanical Refinement for Maximum Gloss
Achieving a flawless surface requires a strict operational protocol. Skip a single step in the grit progression, and the deeper scratches from the earlier stages will remain trapped beneath the shine, creating a hazy finish.
┌──────────────────────────────────────────────────────────────────┐
│                   THE HIGH-GLOSS REFINE RUN                      │
├───────────────────┬──────────────────────────────────────────────┤
│ Operational Phase │ Equipment Configuration                      │
├───────────────────┼──────────────────────────────────────────────┤
│ 1. Deep Stripping │ Black Pad + Low-Speed Rotary (175 RPM)        │
│ 2. Honing Stage   │ 400 Grit Diamond Pad + Slurry Vacuum         │
│ 3. Densification  │ Liquid Silicate Application (Air Dry)         │
│ 4. Ultra Burnish  │ 3000 Grit DIP + High-Speed Burnisher(2000RPM)│
└───────────────────┴──────────────────────────────────────────────┘
Phase 1: Surface Decontamination and Leveling
Before spinning any machine, the floor must be completely clear of structural debris, loose sand, and old coatings. Any tiny pebble trapped beneath a fast-spinning floor polishing pad acts like a runaway piece of shrapnel, carving deep swirl marks into your floor. Wet the surface thoroughly if performing a wet grind to keep airborne crystalline silica dust at zero.
Phase 2: The Honing Progression
Mount your medium-grit diamond pads to your driver plate. Run the rotary machine in a overlapping, cross-hatch pattern—moving horizontally across the room, then vertically. Vacuum up the residual stone slurry frequently to check your scratch pattern uniformity.
Phase 3: Chemical Consolidation (For Concrete and Stone)
Once you hit roughly 400 to 800 grit, apply a liquid chemical densifier (such as lithium or sodium silicate). This liquid penetrates the substrate and reacts with the calcium hydroxide in the concrete, creating a highly dense crystalline structure that makes the floor significantly harder and more receptive to high-gloss polishing.
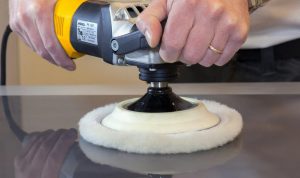
Phase 4: The Final High-Speed Burnish
Switch to an ultra-fine 3000-grit diamond pad or a white hogs-hair burnishing pad. For this final stage, speed is your ally. Transition from a low-speed floor buffer (175 RPM) to a high-speed propane or electric burnisher (1500 to 2000+ RPM). The intense friction generates heat, which melts and flattens the surface polymers or stone micro-crystals into an absolute mirror shine.
The Danger of Thermal Burning
Here is an expert warning that rookie operators learn the hard way: Never let a high-speed burnishing machine sit in one spot while the pad is engaged.
Because high-speed machines spin at thousands of revolutions per minute, a dry pad sitting stationary for even three seconds will generate enough localized friction heat to permanently scorch the flooring material. On VCT or wood, it will instantly liquefy and burn the wax or polyurethane topcoat, leaving an ugly, charred brown ring that requires complete stripping to repair. Always maintain a steady, continuous walking pace whenever the machine is running.
Pro Tip: Keep a close eye on pad loading. As you polish, micro-dust particles will accumulate within the fiber matrix of your pad. If the pad becomes completely choked with dust, it will lose its abrasive efficiency and start sliding over the surface instead of cutting. Periodically stop your machine, remove the pad, and slap it against an outdoor wall or use a stiff-bristled brush to clear the embedded dust pores.
Transform Your Floors From Dull to Dynamic
Mastering the mechanics of surface finishing is one of the most rewarding skills you can develop in home improvement. It takes an asset that looks worn down, dated, and unappealing, and turns it into the primary architectural showcase of the entire home. By selecting the correct floor polishing pad, respecting the strict grit progression hierarchy, and controlling your machine speeds, you can achieve a commercial-grade, light-reflecting finish entirely on your own terms.
Don’t settle for cloudy floors or temporary topical waxes that wear off in a couple of weeks. Go rent a rotary machine, analyze your floor type, and start pulling out that hidden mirror gloss.
What type of flooring do you currently have in your home that has lost its original shine? Drop a comment below with your specific flooring material and current condition, and let’s map out the perfect grit progression to bring it back to life!