I still remember the first “emergency” call I took nearly a decade ago. A homeowner had spent a small fortune on gorgeous white oak planks, only to watch them turn a sickly, plastic-orange hue within six months because they applied the wrong topcoat. It’s a heartbreak I’ve seen too often: people treat their hardwood floor finish as an afterthought, when in reality, it is the only thing standing between your investment and the daily assault of grit, spills, and UV rays.
Think of your hardwood floor finish as the “gorilla glass” for your home. You wouldn’t leave a brand-new smartphone screen unprotected, and you certainly shouldn’t leave organic, porous wood exposed to the chaos of modern living. After ten years of hands-on restoration, I’ve learned that the secret to a floor that looks “expensive” for thirty years isn’t just the wood itself—it’s the strategic science of the finish.
The Invisible Shield: Why Your Choice Matters
Choosing a finish is more than just picking a sheen level. It is a chemical decision that dictates how your wood breathes and ages. When we talk about hardwood floor finish, we are looking at a balance between durability and aesthetics.
In my experience, many homeowners focus solely on the “look,” forgetting that the finish is a sacrificial layer. It is designed to take the scratches so the wood doesn’t have to. If you choose a finish that is too soft, your furniture will dent the fibers; if it’s too brittle, it will crack like an eggshell under high heels.
Water-Based vs. Oil-Based Polyurethane
The most common debate in the industry revolves around these two titans.
-
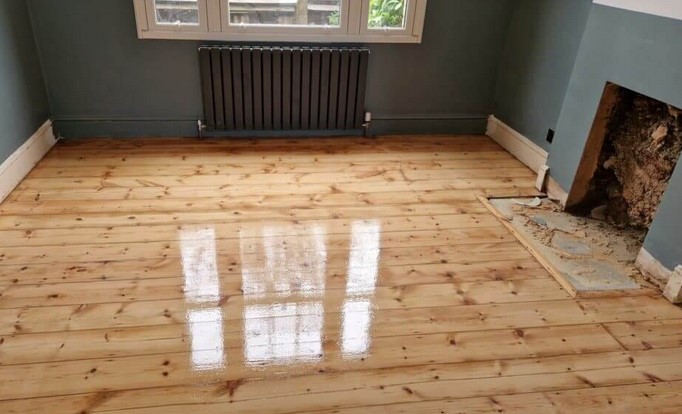
Water-Based Finishes: These are the modern gold standard for those who want to keep the natural, “raw” look of the wood. They dry incredibly fast—sometimes in just two hours—and have very low odor.
-
Oil-Based Finishes: These provide that classic, amber glow. They are thicker and generally more affordable, but they take much longer to dry (up to 24 hours per coat) and emit strong fumes that require significant ventilation.
Pro Tip: If you have a busy household with pets or kids, look for a water-based finish with a ceramic or aluminum oxide catalyst. These are “commercial grade” products that provide a level of scratch resistance that standard DIY-store jugs simply can’t match.
Strategic Application: The Art of the Perfect Coat
Application is where most beginners lose their way. I’ve seen beautiful wood ruined by “lap marks”—those ugly, darker lines where one pass of the applicator overlapped a drying section. To avoid this, you must maintain a “wet edge.”
Think of painting your floor like mowing a lawn, but with the urgency of a ticking clock. You want to work in small, manageable sections, moving from one wall to the other without stopping. If you walk away for a coffee break mid-room, the edge will dry, and you’ll be left with a visible seam that no amount of buffing can fix.
Preparation: The 90% Rule
In the home improvement world, we have a saying: The finish is only as good as the sanding. If your sanding isn’t perfect, the finish will act like a magnifying glass, highlighting every swirl mark and scratch.
-
Vacuum twice, then tack-rag once. Dust is the mortal enemy of a smooth finish. Even a tiny speck of sawdust can create a “pimple” in the polyurethane.
-
Screening (Inter-coat Abrasion): You cannot simply pile one coat on top of another. You must lightly sand (or “screen”) between coats to create “teeth” for the next layer to grip onto.
Navigating Sheen Levels and Aesthetics
The sheen level—Matte, Satin, Semi-Gloss, or High Gloss—is purely a matter of taste, but it carries functional consequences.
-
Matte and Satin: These are my personal favorites for residential homes. They hide dust, pet hair, and minor scratches much better than their shinier counterparts.
-
Semi-Gloss and Gloss: These look spectacular in a showroom or a ballroom. However, in a real home, they act like a mirror for every footprint and smudge.
If you are a perfectionist who doesn’t mind cleaning every day, go for the gloss. If you want a floor that looks “lived-in” and effortless, Satin is the sweet spot.
The Impact of UV Light
One thing I rarely see mentioned in DIY blogs is the “tanning” effect. Just like your skin, wood changes color when exposed to sunlight. Some finishes contain UV inhibitors that slow this process down. If your living room has floor-to-ceiling windows, skipping a UV-resistant hardwood floor finish will lead to “ghosting”—where the wood under your area rug stays light while the rest of the floor darkens.
Hidden Warnings: What the Label Won’t Tell You
After a decade of troubleshooting, I’ve developed a “sixth sense” for potential disasters. Here are the things you need to watch out for:
-
The “Fish Eye” Effect: This happens when the wood is contaminated with silicone (often from common household spray cleaners). The finish will literally pull away from the spot, leaving a hole that looks like a fish eye. Never use silicone-based cleaners on your wood.
-
Humidity is the Enemy: If you apply finish on a day with 90% humidity, it will stay tacky for days and may eventually turn cloudy. Aim for a “Goldilocks” environment: 60-75 degrees Fahrenheit with 40-50% humidity.
-
Avoid “Over-Working”: Once you lay the finish down, leave it alone. The more you brush it or roll it, the more air bubbles you introduce. Let the chemicals do the “leveling” for you.
Maintenance: Keeping the Glow Alive
A high-quality finish should last 7 to 10 years before needing a “screen and coat” (a light refresh). To get there, you need a strategic cleaning regimen.
Stop using steam mops. I cannot emphasize this enough. Steam is the fastest way to kill a hardwood floor. It forces moisture into the joints and under the finish, causing the wood to swell and the finish to peel. Instead, use a microfiber mop and a pH-neutral cleaner specifically formulated for your finish type.
Investing in Longevity
At the end of the day, a hardwood floor finish is a marriage of chemistry and craftsmanship. Whether you are a beginner tackling your first room or a homeowner overseeing a professional crew, understanding these nuances ensures that your floors remain an asset rather than a liability.
Your home is your sanctuary, and the floor is the foundation of its character. Don’t settle for “good enough” when it comes to the layer that supports everything else. Take the time to prep, choose the right chemistry, and apply it with the respect that natural timber deserves.
What kind of wood are you working with for your next project? If you’re stuck between a specific oil or water-based brand, or if you’ve encountered a strange reaction during application, drop a comment or reach out. Let’s make sure your floors stay as vibrant as the day they were installed!